 available on
  also available on


FlickStart and Expressions
Introduction
Fields in FlickStart commands can be calculated at the time a command is used through the expression mechanism.
The image below shows a field in a command where the expression (surrounded by vertical bars) returns the current time (as text) when it is evaluated:

The next image contains an expression which does a little arithmetic and returns a number which becomes part of the text spoken when the command runs:

Expressions can store values in variables through the assignment operator ('=') and the values in the variables can be used in subsequent commands.
Expression Details
Expressions can contain the usual operators such as '+' and '-', parentheses, and a large range of functions such as sin and cos. The operands can be numbers or variables or whole expressions in parentheses.
FlickStart provides a number of built-in variables that contain information generated when built-in functions are invoked.
For a detailed description of how expressions work in FlickStart see the expressions section in the FlickStart Manual.
New and Revised Tags
A number of command groups (tags) have been created using the expression capability.
Some of the existing tags have been extended to include new functions based on expressions.
The tags are listed here. You can access the same information from within FlickStart when you choose the current tab help from the menu while viewing the 'TAGS' tab.
SMS
The commands in this tag fall into a number of groups:
The groups of commands share similar functions introduced by similar keywods.
Commands to immediately send an SMS after you say the contact and content
The commands in this group expect you to provide all the information required to make and send an SMS in a single use of the speech engine. In the list below the first part of each line indicates what needs to be said in order to trigger the command, followed by a description of what the command does:
sms send [number] [message...] - If you know a mobile number by heart you can use this command. It immediately sends an SMS to the mobile number with the body of the SMS set to whatever is said after the number.
Comands to readback the last SMS received
The commands in this group select an SMS from your SMS inbox and play it back as speech:
Comands to readback the last SMS sent
The commands in this group select an SMS from your SMS sentbox and play it back as speech:
Commands to prepare and send an SMS bit by bit
The commands in this group let you build and revise an SMS using speech. You can than send it to default SMS app for final checking, or send it directly. The components of the SMS can be remembered so that you can just change the phone (phone number) and send the body of the SMS to another person. The following commands deal with 'editing' the SMS body and phone:
The next set of commands let you hear the current contents of the SMS body and phone:
The final set of commands deliver the currently constructed SMS either to the target or to an SMS app for review:
Help commands
The commands in this group provide a spoken summary of the SMS commands. One summary command is about immediately sending SMSs and playing back SMSs. The other summary speaks about the commands for preparing an SMS (as opposed to immedaitely sending one):
Calendar
There are two sets of commands in this tag. One set does queries into the calendar, while the other set creates events for insertion to the calendar.
Queries search the title, description and location fields of events.
A voice command like 'calendar find veg chips' will trigger a calendar search, finding only events which contain the characters "veg" and "chips" somewhere in the the three fields mentioned above. If at least one such event is found, the one nearest in time to the present is selected and a summary of the event is spoken and the event brought up in the Calendar app. You can then say 'calendar next again' to look at the next event returned by the query
The query commands search either forwards or backwards from the present moment. Here the forward looking queries:
The backward looking queries are:
The commands for making events are each concerned with setting up a specific part of an event:
For each of the commands that sets a field in the event, there is another that plays it back (eg. 'calendar say description') so that you can check them.
At some point a new event is ready to commit to the calendar and you either use the command 'calendar save' to insert the event into the calendar, or the command 'calendar compose' to fire up the Calendar App and fill the parts into a new event ready for you to do the save manually.
Calculator
The expression evaluation capability in FlickStart fields makes it easy to create a simple voice operated calculator.
The commands in this tag are set up to create a calculator with memory, so you can build up a result bit by bit.
In addition, the commands provide access to the clipboard (if it contains a number).
All the commands start with the word 'calculator' so they don't get confused with any other active commands.
There are three main commands for calculation:
Expressions follow normal rules for precedence, so if you say '5 plus 2 times 3' you get 11 not 21.
You can also use the word 'bracket' for an open or close bracket. For instance '3 times bracket 2.1 plus 4.5 bracket' would come out like '3x(2.1+4.5)'.
There are also operators like 'squared' and 'cubed', but none for square root or cube root.
For more detail on expressions see the manual section on expressions.
In addition to the calculation commands, the commands for conversions have been modified and added here so that they operate on the result of the last calculation:
Finally there are commands to send the last calculated value to the clipboard, or include the current clipboard value in the calculator:
Conversion
The majority of commands in this tag expect a speech pattern of the form
convert [number] from [unit1] to [unit2]For example, you might say
convert 25 from Celcius to FahrenheitThe commands include the reverse pattern
convert [number] to [unit1] from [unit2]where 'to' and 'from' are reversed as it is hard to remember which order is expected by the commands.
The tag may seem to have a lot more commands than it needs, but the excess commands deal with cases where the the first unit might be one, two or three words.
Also included in the tag are examples which are tailored for specific conversions. If you have conversions that you do regularly you can design specific commands that let you reduce the amount of information you need to say in order for the command to trigger.
Details on the units that can be used are described in the manual, but in brief the units FlickStart understands are:
A parallel set of commands to the ones above use the clipboard as the source of the number requiring conversion. The commands use the word 'clip' where the number would have been in the commands above.
The clipboard can be used as the intermediate storage if you use the voice calculator commands to produce a number which needs conversion.
Launch
The set of commands in this tag let you launch apps by voice regardless of what is on-screen, or even when the screen is off.
All the commands begin with the word 'start' and are followed by the app name or some shorthand for the app name (eg. 'start maps' will start Google Maps).
There are also some commands which use a third word to select a specific part of an app (eg. 'start settings wifi' brings up the WiFi screen in Settings).
Most of the apps represented in the command list are basic Android apps, along with a few well known apps.
It is suggested you delete commands that refer to apps you don't use.
You can easily change the trigger words for the commands from the TAGS tab by tapping on the 'Launch (Speech)' tag and then tapping on a command you want to alter. Inside the command, the field called 'Speech pattern' is the one you should alter if you want to start the app using different words.
Since you are likely to want to launch apps not in the current list, we will go through the process of creating a couple of these commands as a guide.
Some apps like the Settings app let you jump straight into a panel that would take many taps to get to if you started from the inital panel. You can create FlickStart commands that launch straight to a particular panel. We will do an example now creating a command which, when triggered, brings up the battery usage panel in Settings. This is the panel we want to get to when we trigger the command:

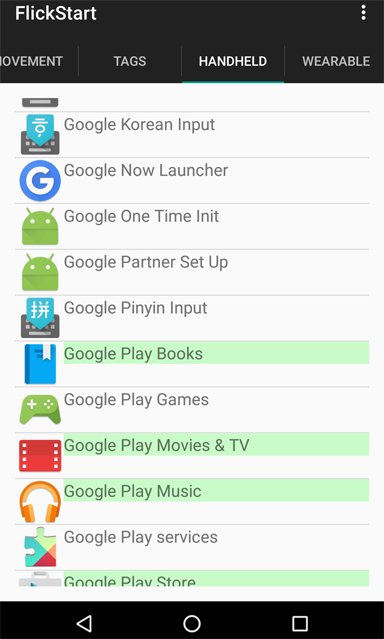
We begin setting up the command by going to the HANDHELD tab in FlickStart and finding the Settings app in the list:
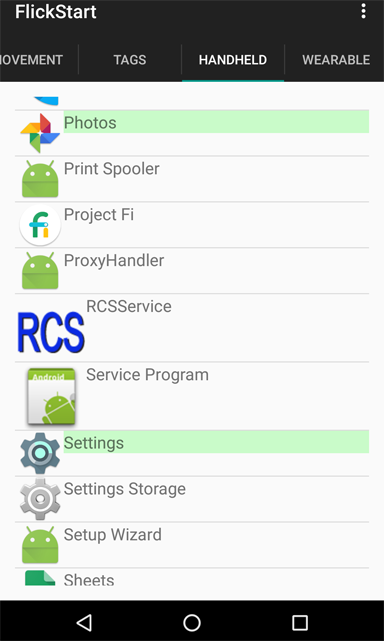
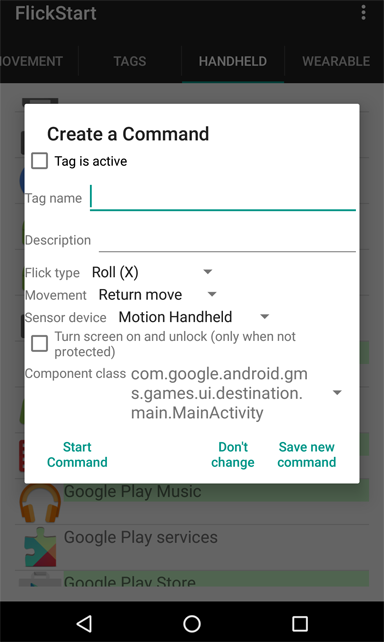
In the image above the Settings app is shown on a green background. This means there already exists one or more commands based the Settings app, and the commands are part of an active tag. When we tap on the 'Settings' row, we will see one the existing commands:
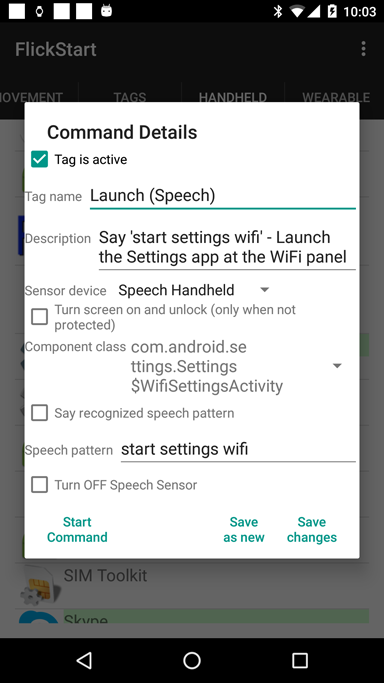
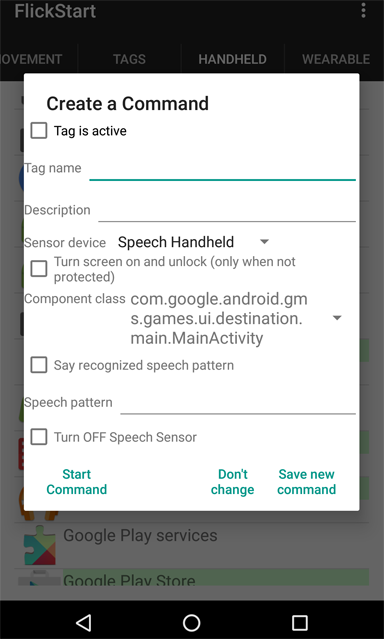
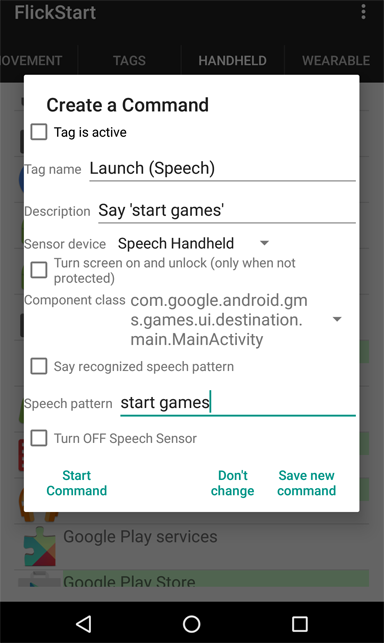
We will redefine some of the settings in the panel and save the aletered panel as a new command. The first step is to update the description and speech pattern fields:
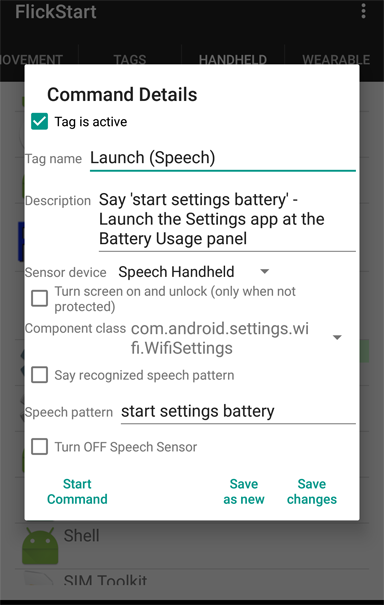
Then we need to open up the 'Component class' field and scroll through it till we find an activity which displays the panel we want to jump into:
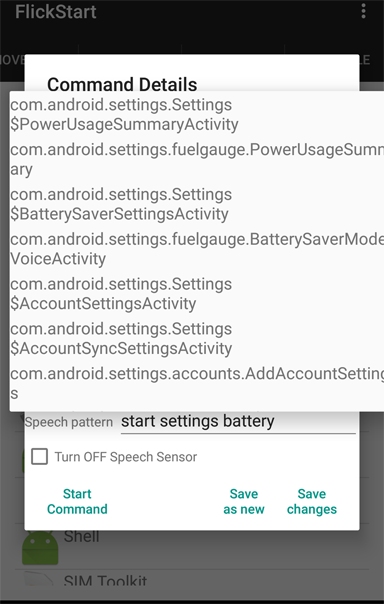
After making a choice the panel is ready to be saved:
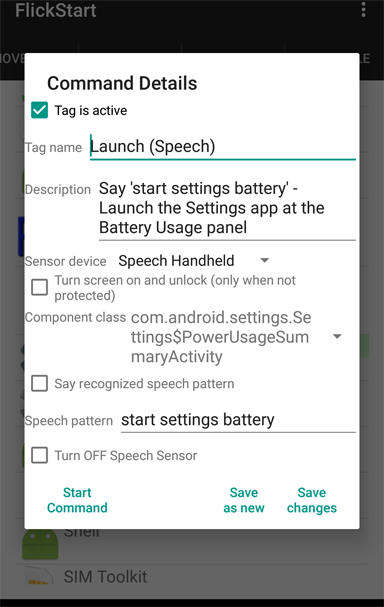
As we started with an existing command, the buttons at the bottom of the panel give us two choices. We can replace the original command (using the 'Save changes' option), or leave the original command and save this panel as an entirely new command (using the 'Save as new' option). In this case we would choose 'Save as new'.
The component class choice was perhaps the most difficult step in the whole process we just went through. Apps like 'Settings' offer a huge number of choices and it won't always be clear which to choose. Experimentation is likely to be required in many cases as the choices are unlikely to be documented. You can use the 'Start Command' button after choosing an entry in the list to test your choice.
Date and Time
The commands in this tag make use of a number of characteristics of date variables in expressions.
The functions provided by the commands are:
From these commands you can construct others. For instance you could take the 'time diff [city]' command and make a new one which calculated the time difference between any two cities.
Charting
The examples in this tag use the built-in calculation and charting functions.
The examples are built around one or more formulas which are used to calculate the points on a graph (or set of graphs).
A chart is built by evaluating the formulas in a loop and varying the value of a key variable slightly each time around the loop.
Voice control is provided to force a redraw of the chart with new parameters.
There are four examples:
The last example has no parameters and always draws the same curve. The first three examples each have an initialization command which should be used first to assign reasonable starting values. After the intialization command, you can use another where you specify a new value for one of the parameters. The curve(s) will be redrawn with the new parameter value.
The commands set parameter values using names like 'top' and 'left' rather the sort of names you might expect such as X or Y because common easily pronounced words are more reliably recognized by the speech recognition system.
Before creating your own charting commands check the manual section on expression syntax and evaluation, and the one on the built-in charting function.
Lissajous Pattern Details
Lissajous patterns are produced by combining two out of phase sine waves. A typical pattern looks like this:
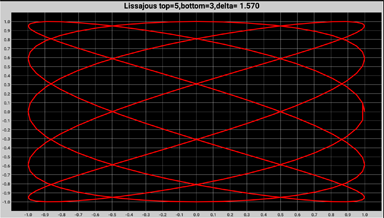
The formula for the patterns is.
x = sin(top * theta + delta)y = sin(bottom * theta)
The angle 'theta' is set to vary from 0 to 2π.
The value 'delta' produces a kind of rotation effect, but has been left as π/2 in this example.
The ratio 'top/bottom' controls the interesting patterns. Normally 'top' and 'bottom' are set to integer values.
Make sure you say the command 'pattern start' to get your first Lissajous figure. This will initialize all the variables.
After that you can create a new pattern by saying something like 'pattern top 7', or 'pattern bottom 3'.
4-Bar Linkage Details
The equations in this example find the position of some points on a planar quadrilateral linkage. The linkage can be represented like this:
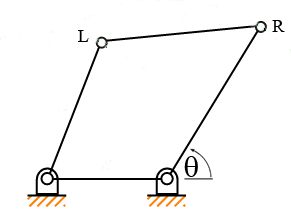
The four bars are joined by hinges. We have named the bars 'bottom', 'top', 'left' and 'right' to make speaking them easier. In this configuration, the bottom bar is fixed and we sweep the right bar around it's bottom hinge through an angle theta from 0 to 2π.
The linkage can usually be assembled in two ways. One way is shown in the diagram, and the other way (for that diagram) is with the point L much closer to the bottom of the 'right' bar.
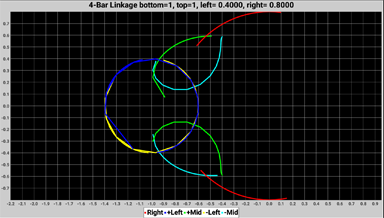
The graphs plotted as theta goes from 0 to 2π will be:
But, because the point L has an alternate location we need to draw two more graphs:
So we end up with five graphs. Here is a sample:

The legend for the graphs at the bottom of the image is labelled so that one set of positions for L and the midpoint are '+Left' and '+Mid', while the alternate set are named '-Left' and '-Mid'.
Its not difficult to choose lengths for the links which make it impossible to completely rotate the right link without breaking the hinges. If you should choose such values you will see that the red graph for the point R won't be a full circle.
Make sure you say the command 'link start' to get your first chart. This will initialize all the variables.
After that you can create a new set of graphs by saying something like 'link top 1.1', or 'link right 0.3'.
You can create variations on the the command that changes just one linkage length by copying the command and adjusting the 'Speech pattern' field. The current command has a definition of:
link [new:word:top,left,right,bottom] [num:number]If you were interested in changing the left and top lengths together each time you generated a chart, you could change the definition to:
link [l_left:number] [l_top:number]and also change the 'Step count' field from:
100|(lk_%new%=%num%).ignore|to
100|(lk_left=%l_left%).ignore||(lk_top=%l_top%).ignore|If the links move a long way for a small change in theta at some point, parts of the graph might not be smooth. If you want the graphs to be smoother increase the step count (currently 100) in the command. Increasing the count will mean it takes longer for the chart to be calculated!
Cubic Function Details
The formula for a cubic function is:
y = a*x^3 + b*x^2 + c*x + da,b,c,d are the coefficients.
For this chart we have name the coefficients 'one', 'two', 'three' and 'four' instead of a,b,c,d.
This makes them easier for the speech recognizer to pick up correctly.
Make sure you say the command 'cubic start' to get your first cubic curve. This will initialize all the variables.
After that you can create a new curve by saying something like 'cubic set 2 equals 0.3'. This would set coefficient 'two' to 0.3 before drawing the curve. Don't say 'cubic set 2 to 0.3' as the 'to' is likely to get picked up as the number '2'!
Cardioid Pattern Details
The formula for the Cardioid function is:
x = cos(theta) * (1-cos(theta))y = sin(theta) * (1-cos(theta))
The angle 'theta' is set to vary from 0 to 2π.
There are no parameters for this graph. To draw it say 'cardioid'.
The commands in this tag fall into a number of groups:
The commands are used to prepare an email before sending it to an email app for final review and sending. Most groups of commands manipulate a single field (eg. the subject field) within the email being constructed.
The fields are stored inside FlickStart until the phoone is restarted so commands are provided to restart each field and to say what it contains (to allow confirmation of the contents).
Commands to create and update the body of an email
This group of commands is used exclusively for preparing the body of the email:
FlickStart provides for up to 10 addresses to be placed in the email's address field. The addresses are accessed by number starting at 1 (although the first address doesn't need to have a number.
Addresses must be selected from the phone's contact database. You specify a contact name and that contact needs to have an email address set.
Any blank (or reset) addresses will be ignored.
Commands to manage the CCes for an email
If you want to set CC email addresses, this is the group of commands for setting them up.
The commands manipulating CC addresses operate exactly the same way the address field commands do.
The commands are exactly the same as well except the word 'address' is replaced by 'CC'.
Commands to manage the BCCes for an email
If you want to set BCC email addresses, this is the group of commands for setting them up.
The commands manipulating BCC addresses operate exactly the same way the address field commands do.
The commands are exactly the same as well except the word 'address' is replaced by 'BCC'.
Commands to manage the subject for an email
The subject field has just two commands as it is expected to be just a small amount of text:
Commands that operate on the entire email
The 'email compose' command is the final step in preparing an email. After creating the email body, subject and address, you use 'email compose' command to export the email to your email app where you can review the email before sending.
Google Maps
The Google maps app allows other apps to do a few operations via Android Intents and they are used in this set of commands.
There are three groups of commands:
Further details on the parameters the Google Maps app allows are given here. Unfortunately the Google Maps app doesn't provide a mechanism to give calling apps any data back, so the number of things that can be done via the Android Intent are a bit limited.
Clipboard
The group of commands in this tag are an example of how you might apply clipboard contents to existing tags.
All the commands in this example direct clipboard contents to fields in a Calendar event you are creating bit by bit before storing the event in your Calendar.
Each command assumes you have found some text and done a copy operation to put the text in the Clipboard.
Each command puts the current clipboard contents into a different field of a calendar event using speech.
For instance if you say 'clip to calendar title', the current Clipboard contents are copied into the title of the Calendar event you are building.
Saying 'clip to calendar start' would copy the clipboard contents into the start time field of the Calendar event.
Contacts
The first set of commands are used to look up a contact and return some information about the contact.
For instance if you say 'contact work Nancy' the response will be the contact's full name followed by their work number (if there is one).
These commands can you give you the mobile number, work number, email address and IM name.
In the case of the IM name, there is a command which picks out the 'Skype' IM name. You can duplicate this command and change the target IM (eg. 'Yahoo') to suit.
The second set of commands are used if you have looked up a contact using a FlickStart command (eg. the SMS commands). You can get the same information for the contact found on that last lookup by saying the commands described above but using 'last' as the contact name.
